As an Amazon Associate, we earn from qualifying purchases. This does not affect the price you pay or the quality of the products you buy. For more information, please read the full affiliate disclosure here.
All generator brands come with fuel filters to prevent dirt and other fuel contamination from passing through the fuel line into the carburetor.
However when the fuel filter becomes clogged due to these dirts or fuel contaminates, it’s important you clean it instantly so you can prevent it from damaging your carburetor as well as your generator engine.
Hence, in this article, we will discuss the steps to clean your generator fuel filter, the signs of a clogged filter, safety precautions, and maintenance tips to keep your generator in top condition.
Note: Whether you are using a portable gasoline generator or diesel generator, the steps outlined in this article are the same method to apply. However, if it’s something you can’t do, ensure you consult a professional to help.
Importance of a Clean Generator Fuel Filter

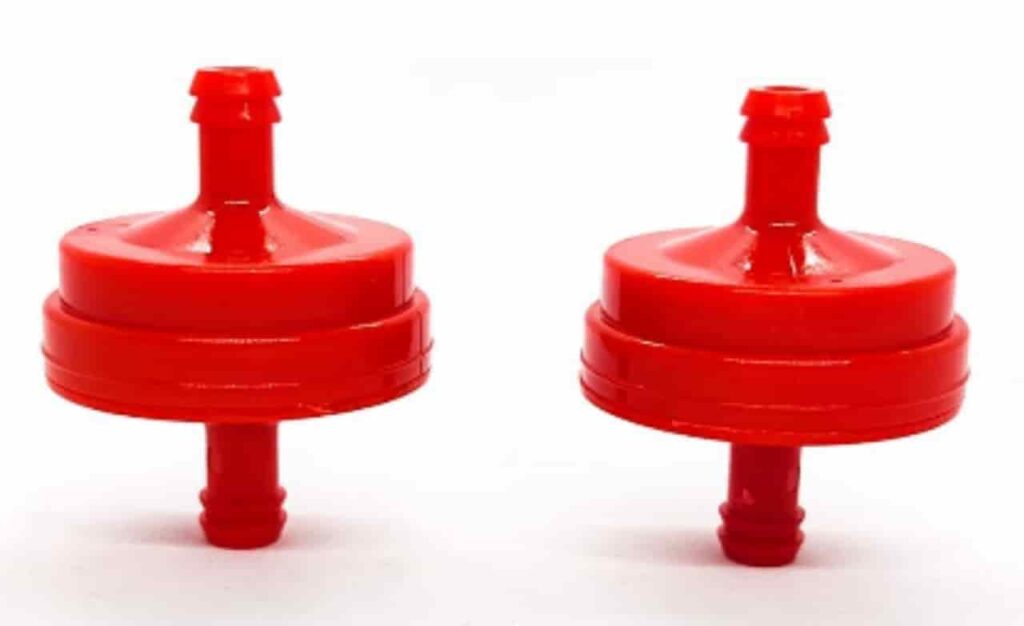
The Stratton Fuel Filter
The Stratton fuel filter is great for lawn mower, but if you also use a portable generator it can work great for you. However just like every generators, portable generators come with three fuel filter, one at the tank, at the fuel valve and fuel line. For the fuel lines, you can go for the Stratton fuel filter.
The role of fuel filters in generators is underrated. The fuel filter in a generator acts as a guardian, safeguarding the engine from harmful particles present in the fuel.
When the fuel passes through the fuel valve to the filter, it traps all kinds of dirt, rust, and other contaminants, preventing them from entering the engine.
A clean fuel filter ensures a consistent flow of clean fuel, improving the generator’s overall performance and fuel efficiency.
Neglecting the fuel filter can lead to clogging, reduced power output, and potentially costly repairs of your generator.
Signs of a Clogged Fuel Filter
A clogged fuel filter can cause various issues that may indicate it’s time for a cleaning. Look out for the following signs:
1. Engine Sputtering: If you notice the engine sputtering or hesitating during operation, it might be due to restricted fuel flow caused by a clogged filter.
2. Difficulty Starting: Difficulty starting the generator, especially after a prolonged period of inactivity, could indicate a clogged fuel filter preventing adequate fuel supply.
3. Reduced Power Output: A clogged fuel filter can lead to a decrease in the generator’s power output, affecting its ability to handle heavy loads.
4. Frequent Stalling: If your generator stalls frequently or unexpectedly, the fuel filter may be the culprit.
Also Read:- How to Stop Fuel Leaking from Carburetor in 8 Steps + Video
Safety Precautions Before Cleaning the Fuel Filter
Before diving into the fuel filter cleaning process, it’s essential to ensure your safety and prevent any accidents. Follow these safety precautions:
1. Turn Off the Generator: Always turn off the generator and let it cool down before attempting to clean the fuel filter.
2. Disconnect the Spark Plug: To avoid any accidental engine ignition, disconnect the spark plug wire.
3. Work in a Well-Ventilated Area: Cleaning the fuel filter can release harmful fumes. Work in a well-ventilated space to avoid inhalation.
Tools and Materials Required When Cleaning Your Fuel Filter
To clean the generator fuel filter, you will need the following tools and materials:
- Safety gloves and goggles
- Wrench or screwdriver
- Clean cloth or rag
- Fuel container
- Fuel line clamp or vise
Step-by-Step Guide to Cleaning the Generator Fuel Filter
Follow these step-by-step instructions to clean your generator’s fuel filter effectively:
1. Turn Off the Generator
Start by turning off the generator and allowing it to cool down completely. This ensures your safety and prevents any accidental fuel leaks during the cleaning process.
2. Locate the Fuel Filter
Refer to your generator’s user manual to locate the fuel filter. It is typically found along the fuel line, between the fuel tank and the carburetor or fuel injector.
3. Release Fuel Pressure
Before removing the fuel filter, you need to release the fuel pressure. Locate the fuel shut-off valve and turn it to the “Off” position. Then, start the generator and let it run until it stalls. This will consume the remaining fuel in the line and relieve pressure in the system.
4. Remove the Fuel Filter
Using a wrench or screwdriver, disconnect the fuel lines connected to the fuel filter. Take note of the fuel line connections to ensure proper reinstallation later. Carefully remove the fuel filter from its mounting bracket.
5. Inspect the Fuel Filter
Examine the fuel filter for any signs of damage, excessive dirt, or clogging. If the filter appears damaged or extremely dirty, it is advisable to replace it with a new one.
6. Clean the Fuel Filter
If the fuel filter is reusable, proceed with cleaning it. Use a clean cloth or rag to wipe away dirt and debris from the filter element. Avoid using compressed air or blowing on the filter, as it can force contaminants deeper into the filter.
7. Reinstall the Fuel Filter
Once the fuel filter is clean and dry, carefully reinstall it in the mounting bracket. Ensure the fuel lines are properly connected, referring to the notes taken during removal. Tighten the connections securely, but avoid over-tightening, which can damage the fuel filter or the fittings.
8. Check for Leaks
After reinstallation, double-check all connections for any signs of leakage. Turn the fuel shut-off valve to the “On” position and inspect the fuel lines and filter for leaks while the generator is running. If you notice any leaks, immediately shut off the generator and address the issue before continuing.
Maintenance Tips to Prevent Fuel Filter Clogging
Regular maintenance is key to preventing fuel filter clogs and ensuring the longevity of your generator. Consider the following maintenance tips:
1. Regular Inspections: Periodically inspect the fuel filter for signs of dirt or damage. Clean or replace it as necessary.
2. Fuel Quality: Use clean, high-quality fuel to minimize the accumulation of contaminants in the fuel filter.
3. Fuel Stabilizer: If your generator will be inactive for an extended period, consider adding a fuel stabilizer to prevent fuel degradation and clogging.
4. Scheduled Maintenance: Follow the manufacturer’s recommended maintenance schedule for your generator, which may include fuel filter replacement at specific intervals.
Final Thought
Keeping your generator’s fuel filter clean is essential for optimal performance and reliable power supply.
Regularly inspecting and cleaning the fuel filter ensures a steady flow of clean fuel to the engine, preventing clogs and potential damage.
By following the step-by-step guide provided in this article and adhering to the recommended maintenance practices, you can prolong the life of your generator and avoid costly repairs.
Frequently Asked Questions
1. How often should I clean my generator fuel filter?
It is recommended to clean the generator fuel filter every 200 hours of operation or as per the manufacturer’s guidelines.
2. Can I clean a disposable fuel filter?
Disposable fuel filters are designed for one-time use and should be replaced instead of cleaned.
3. What type of fuel filter should I use for my generator?
Consult your generator’s user manual or contact the manufacturer to determine the appropriate fuel filter type and specifications for your specific model.
4. Can a clogged fuel filter damage my generator?
Yes, a clogged fuel filter can restrict fuel flow, leading to decreased power output and potential engine damage if not addressed promptly.
5. Is it necessary to wear safety gear when cleaning the fuel filter?
Yes, wearing safety gloves and goggles is essential to protect yourself from fuel spills and potential eye injuries during the cleaning process.
Share


