As an Amazon Associate, we earn from qualifying purchases. This does not affect the price you pay or the quality of the products you buy. For more information, please read the full affiliate disclosure here.
You have invested in a Generac generator to ensure that you always have backup power for your home or business.
You trust that your generator will work flawlessly when you need it the most.
But what if one day you see a strange error message on your generator’s display: “Missing Cam Pulse”?
What does this mean?
Is your generator broken?
Do you need to call a technician?
How can you fix this problem yourself?
Don’t worry; we are here to help. In this article, we will explain what the missing cam pulse error is, what causes it, and how you can troubleshoot and fix it in a few simple steps.
By the end of this article, you will be able to restore your generator’s performance and avoid costly repairs.
Let’s get started!
What Causes a Missing Cam Pulse Error?
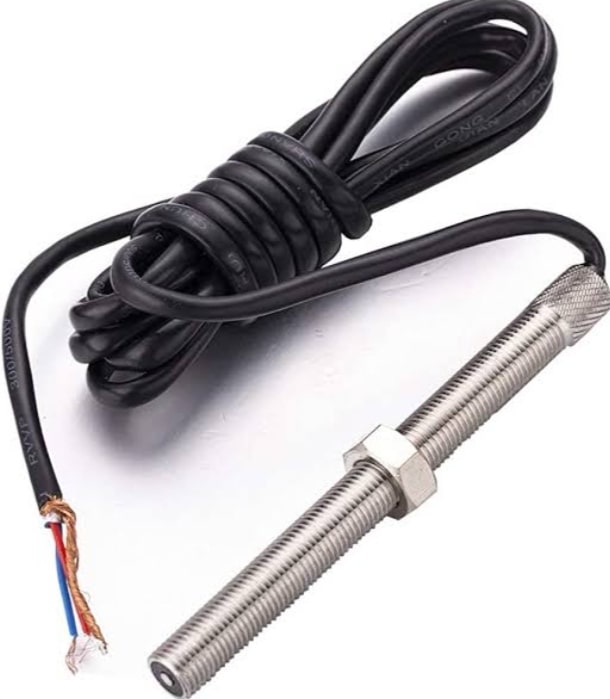
The missing cam pulse error is usually caused by a faulty or misaligned magnetic pickup (MPU) sensor.
The MPU sensor is a small device that is mounted near the camshaft and generates a signal when the camshaft rotates.
The signal is sent to the control board, which uses it to synchronize the spark and fuel delivery.
If the MPU sensor is damaged, dirty, loose, or out of position, it may not generate a proper signal or no signal at all.
This will result in the missing cam pulse error and prevent the generator from starting or running smoothly.
The image below is what the magnetic pickup sensor looks like on your Generac generator.

How do I check and replace MPU sensors?
The first thing that you should do when you encounter the missing cam pulse error is to check the MPU sensor and its wiring.
What You Will Need
To check and replace the MPU sensor on your generator, you will need the following tools:
- A multimeter
- A wrench
- A screwdriver
- A feeler gauge
You will also need to refer to your owner’s manual or contact a professional for specific details about your generator model and the location of the MPU sensor if you can’t find it under the coil pack or near the flywheel of your Generac generator.
After getting your tools and locating the MPU sensor, here are the steps to follow to check and replace the MPU sensors on your Generac generator.
ALSO CHECK OUT:- Generac Generator RPM Sense Loss: Causes And Troubleshooting Guide
Step 1: Turn off and disconnect the generator.
Before you start working on the generator, make sure that it is turned off and disconnected from the power source.
This will prevent any electric shocks or injuries. You may also want to wear gloves and safety glasses for extra protection.
Step 2: Locate and disconnect the MPU sensor.
The MPU sensor is a small device that is mounted near the camshaft and has a wiring harness attached to it.
Depending on your generator model, it may be located under the coil pack or near the flywheel. Refer to your owner’s manual for more details.
To disconnect the MPU sensor, use a wrench or a screwdriver to loosen the mounting screws and carefully pull out the wiring harness from the sensor. Be gentle and avoid damaging or twisting the wires.
Step 3: Inspect the wiring harness
Once you have disconnected the MPU sensor, inspect the wiring harness for any signs of damage, corrosion, or loose connections.
If you find any problems, you will need to replace or repair the wiring harness before proceeding to the next step.
Step 4: Test the MPU Sensor
To test the MPU sensor, you will need to use a multimeter to measure its resistance.
Set your multimeter to measure resistance (ohms) and touch the probes to the two terminals of the MPU sensor.
The resistance should be between 1 and 2 ohms. If it is higher or lower than that, or if there is no reading at all, the MPU sensor is defective and needs to be replaced.
Step 5: Adjust the Air Gap
If the resistance of the MPU sensor is within the acceptable range, reconnect the wiring harness to the MPU sensor and check the air gap between the sensor and the camshaft.
The air gap is the distance between the tip of the sensor and the surface of the camshaft.
It should be about 0.015 inches (0.38 mm). You can use a feeler gauge to measure it.
If the air gap is too large or too small, you will need to adjust it by loosening or tightening the mounting screws of the MPU sensor.
Make sure that the sensor is aligned with the camshaft and that there is no contact between them.
Step 6: Reconnect and restart the generator.
After you have checked and replaced or adjusted the MPU sensor, reconnect the power source to the generator and try to start it.
If everything is working properly, you should not see any missing cam pulse errors on your generator’s display. But first, you need to reset the generator.
If you still encounter this error, you may need to replace the control board or contact a professional service technician for further assistance.
Final Thought
The missing cam pulse error on Generac generators is a common problem that can be easily fixed by checking and replacing the MPU sensor or adjusting its air gap.
By following these simple steps, you can restore your generator’s performance and avoid costly repairs.
However, if you are not confident in your skills or if you encounter any difficulties, it is always advisable to consult a qualified technician for help.
I hope this blog post has helped you understand how to fix missing cam pulse errors on Generac generators. If you have any questions or comments, please feel free to leave them below.
Share


